🗺️ A Complete Node.js Backend Roadmap for Freshers
Welcome to the most practical, no-nonsense guide to becoming a job-ready Node.js Backend Developer in 2026. If you've been feeling lost in a sea of tutorials, this roadmap will give you a clear, structured path from absolute beginner to building production-ready APIs.
In 2026, Node.js remains the most used web technology, employed by roughly 48.7% of developers worldwide . Companies of all sizes—from startups to enterprises like Netflix, LinkedIn, and Uber—use Node.js to build fast, scalable backend services. This roadmap is specifically designed for freshers: you'll learn what to learn, when to learn it, and why it matters.
The Most Important Shift: Your value as a backend developer isn't just writing code. It's about understanding how to design reliable APIs, manage data, secure user information, and deploy systems that don't break when real users start using them. This roadmap builds that mindset from day one .
📌 Your Node.js Tech Stack at a Glance
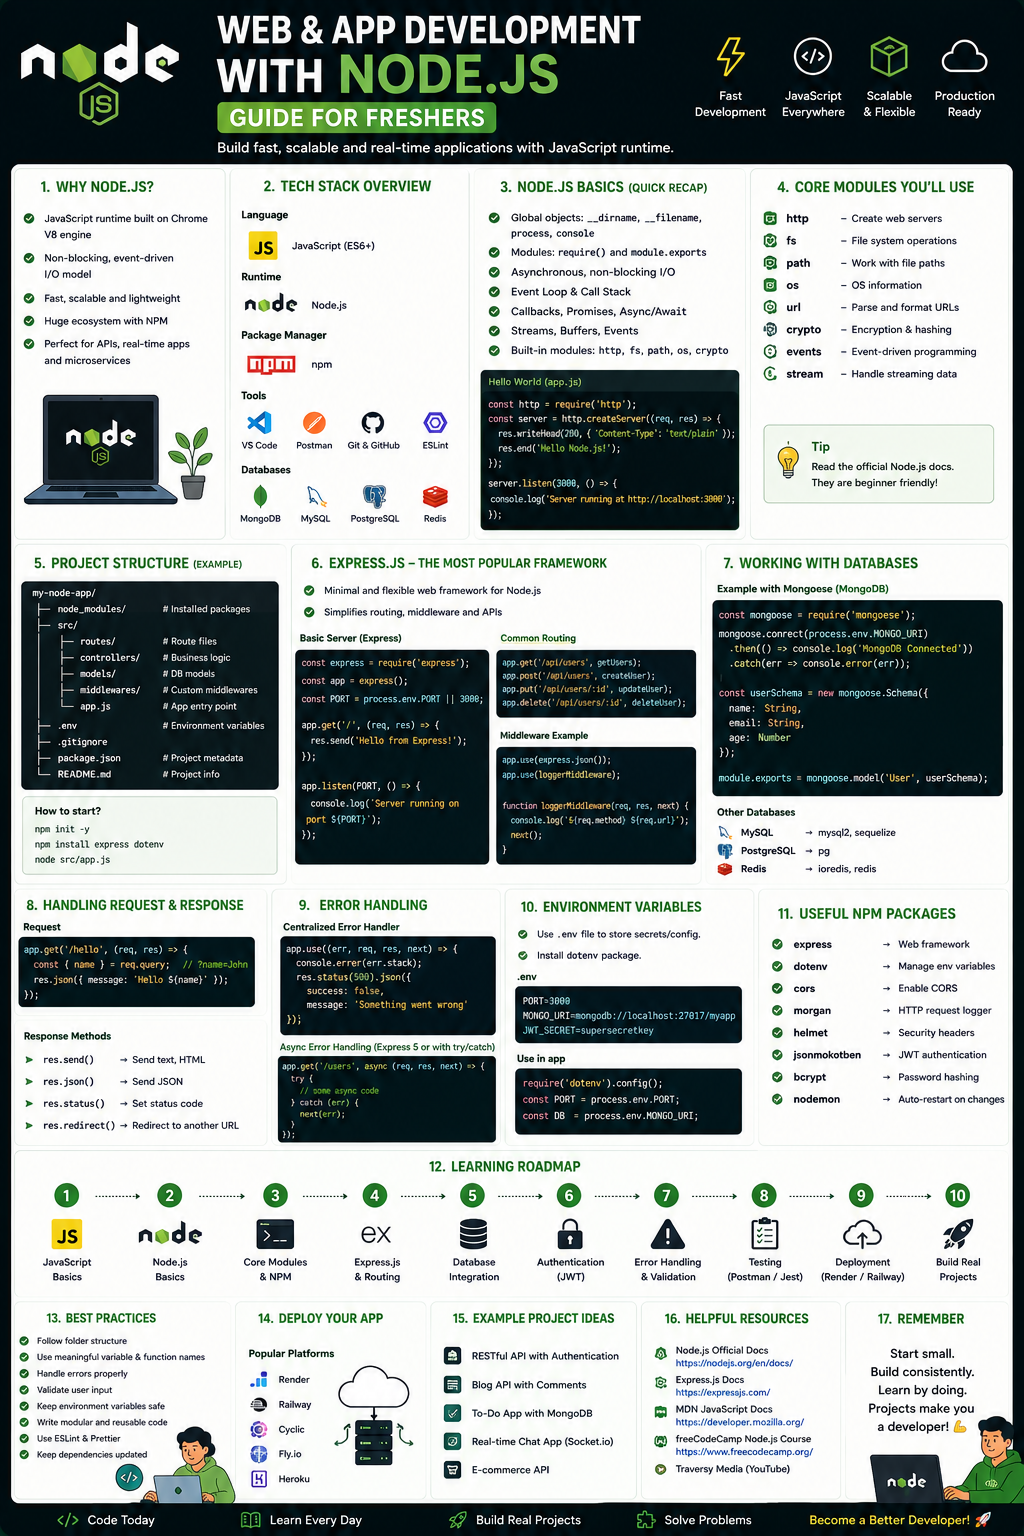
Here is the exact stack that employers are looking for in Node.js backend roles right now:
- Language: JavaScript / TypeScript — JavaScript is the foundation; TypeScript adds type safety for larger apps
- Core Framework: Node.js + Express.js — Industry standard for building REST APIs and web servers
- Database: MongoDB (NoSQL) + Mongoose ODM — Flexible document database perfect for Node.js apps
- Database (Alternative): PostgreSQL + Prisma ORM — Relational database for complex data relationships
- Authentication: JWT (JSON Web Tokens), bcrypt — Secure user login, password hashing, session management
- API Tools: REST API design, Postman — Testing and documenting your endpoints
- DevOps Basics: Git, GitHub, Basic CI/CD — Version control and automated deployment
- AI-Assisted Dev: GitHub Copilot, Cursor — Accelerate coding while learning best practices
Node.js Developer salaries are competitive. In the UK, the median salary is £75,000, with top earners reaching £110,000. In the US, experienced Node.js developers earn around $143,000 on average. More importantly, backend development skills open doors across every industry—from finance to healthcare to e-commerce.
Note for Freshers: You don't need a CS degree to start this path. Structured online programs and a strong portfolio are sufficient for landing your first backend role.
📚 Phase 1: The Unskippable Foundation (Weeks 1-4)
Goal: Build a rock-solid foundation in JavaScript. Do not skip this phase to "get to Node.js faster." Every concept you learn here will come back daily in your backend work.
Week 1-2: Modern JavaScript (ES6+) Mastery
Before you write a single line of Node.js code, master these JavaScript fundamentals:
Variables & Scoping:
let and const (never use var in modern code)- Block scope vs. function scope
Functions:
- Arrow functions and their lexical
this binding - Function declarations vs. expressions
Data Structures:
- Objects and arrays (you'll use these constantly)
- Destructuring objects and arrays in function parameters
Essential Array Methods (Used Daily):
.map() – Transform every item in an array.filter() – Select specific items.reduce() – Aggregate array data into a single value.find() – Locate a single item
Asynchronous JavaScript (Critical for Backend):
- Promises and promise chaining
async/await syntax (modern standard)- The event loop—understanding this helps you debug performance issues
Modules:
import and export syntax (ES modules)- CommonJS (
require) vs. ES modules
Week 3-4: Backend Prerequisites
Before building APIs, understand these concepts:
How HTTP Works:
- What happens when a client requests data from a server
- HTTP methods: GET (read), POST (create), PUT (update), DELETE (remove)
- HTTP status codes: 200 (OK), 201 (Created), 400 (Bad Request), 401 (Unauthorized), 404 (Not Found), 500 (Server Error)
- Headers and request/response structure
Command Line Basics:
- Navigating directories:
cd, ls, pwd - Running Node.js files:
node filename.js - Installing packages with
npm
Git Version Control (Non-Negotiable):
git init, git add, git commit, git push, git pull- Creating branches and merging
Practice Project for Phase 1
Build a Command-Line Todo App:
- Create a script that runs from the terminal
- Store tasks in memory (array of objects with id, text, completed)
- Features: add task, list tasks, mark complete, delete task
- Use only vanilla JavaScript and Node.js core modules (no npm packages yet)
Free Resources for Phase 1
- Free 5-Hour Node.js Course by Simplilearn — Video course (free certificate) covering Node.js architecture, NPM, asynchronous programming, Express framework basics
- Learn Node.js Mobile App (Google Play) — Free interactive app covering Node.js fundamentals, core modules (fs, http, path), Express.js, MySQL/MongoDB integration
- Scrimba Learn Node.js (3.5h, Tom Chant) — Interactive screencasts with free completion certificate; pause and edit code during lessons
- The Odin Project – NodeJS Path — Free, project-based self-study curriculum with real projects from day one
Recommendation: Start with the Scrimba course—its interactive format forces you to write code, not just watch videos. Supplement with the Learn Node.js app for mobile practice during commutes.
🚀 Phase 2: Node.js & Express.js Core (Weeks 5-8)
Goal: Build REST APIs that handle real HTTP requests, process data, and return responses.
Week 5-6: Node.js Fundamentals
Core Node.js Concepts:
The Event Loop (Understand This Well):
- Node.js is single-threaded but non-blocking
- How callbacks, promises, and async/await work with the event loop
- This is often tested in interviews and critical for performance debugging
Core Modules You'll Use Constantly:
fs – Read and write files (for logging, configuration)http – Create HTTP servers (though Express wraps this)path – Work with file and directory pathsos – Get system information (memory, CPU cores)events – Emit and listen to custom events
npm (Node Package Manager):
npm init -y – Create a package.json filenpm install <package> – Add dependenciesnpm install -D <package> – Add dev dependencies (like nodemon)- Understanding dependencies vs devDependencies
Environment Variables:
- Creating
.env files to store secrets (API keys, database passwords) - Using
dotenv package to load them - Never commit
.env files to GitHub
Week 7-8: Express.js Framework
Setting Up Your First Express Server:
javascript
import express from "express";

const app = express();

// Middleware to parse JSON in request bodies
app.use(express.json());

// GET endpoint
app.get("/", (req, res) => {
  res.send("Backend is running! 🚀");
});

// POST endpoint
app.post("/api/users", (req, res) => {
  const { name, email } = req.body;
  res.status(201).json({ message: `User ${name} created` });
});

const PORT = 5000;
app.listen(PORT, () => {
  console.log(`Server listening on port ${PORT}`);
});
Core Express Skills:
Routing:
app.get(), app.post(), app.put(), app.delete()- Route parameters:
/api/users/:id - Query parameters:
/api/products?category=electronics&limit=10
Middleware (Express's Superpower):
app.use() for global middleware- Custom middleware functions:
(req, res, next) => {...} - Built-in middleware:
express.json(), express.urlencoded() - Third-party middleware:
cors, helmet, morgan - Error handling middleware
Request and Response:
req.params – Access route parametersreq.query – Access query stringsreq.body – Access JSON payloads (requires express.json())res.send() – Send HTML/textres.json() – Send JSONres.status() – Set HTTP status code
MVC Architecture Pattern:
- Models – Database schemas and data logic
- Views – Templates (EJS for server-side rendering)
- Controllers – Handle requests, work with models, return responses
- Routes – Map URLs to controller functions
Practice Project for Phase 2
Build a Task Manager API:
- Create REST endpoints for managing tasks: GET /api/tasks, POST /api/tasks, PUT /api/tasks/:id, DELETE /api/tasks/:id
- Store tasks in an array (in-memory database for now)
- Add validation: name is required, price is positive number
- Use proper HTTP status codes: 201 for creation, 400 for validation errors, 404 for not found
- Test all endpoints using Postman
Free Resources for Phase 2
- Scrimba Learn Express.js (4h, Tom Chant) — Interactive screencasts covering routing, middleware, request/response handling, error management
- Simplilearn Node.js Course (continued) — Video course covering HTTP server creation with Node.js, Express.js framework, SocketIO basics
- MERN Stack Tutorial on GitHub — Step-by-step code with complete server setup walkthrough with Express and MongoDB
🗄️ Phase 3: Database Integration (Weeks 9-12)
Goal: Make your APIs persist data permanently. This is where your backend becomes truly useful.
Week 9-10: MongoDB & Mongoose (NoSQL Path)
Why MongoDB with Node.js: MongoDB stores data as JSON-like documents, which maps naturally to JavaScript objects you're already working with. It's the most common database paired with Node.js for learning and many production apps.
Core MongoDB Concepts:
Collections and Documents:
- A collection is like a folder (e.g., "users", "products")
- A document is like a file—one record with flexible fields
- BSON format (Binary JSON) stores the data
Setting Up MongoDB:
- Sign up for MongoDB Atlas (free tier)
- Create a cluster
- Add your IP address to allowed access list
- Copy the connection string
Connecting to MongoDB in Node.js:
javascript
import mongoose from "mongoose";

mongoose.connect(process.env.MONGODB_URI);

mongoose.connection.on("connected", () => {
  console.log("MongoDB connected successfully");
});
Creating a Mongoose Schema & Model:
javascript
import mongoose from "mongoose";

const productSchema = new mongoose.Schema(
  {
    name: {
      type: String,
      required: true,
    },
    price: {
      type: Number,
      required: true,
    },
    image: {
      type: String,
      required: true,
    },
  },
  {
    timestamps: true, // Adds createdAt and updatedAt automatically
  }
);

const Product = mongoose.model("Product", productSchema);
export default Product;
CRUD Operations with Mongoose:
javascript
// CREATE
const newProduct = new Product(productData);
await newProduct.save();

// READ (all products)
const products = await Product.find({});

// READ (single product)
const product = await Product.findById(id);

// UPDATE
const updated = await Product.findByIdAndUpdate(id, updateData, { new: true });

// DELETE
await Product.findByIdAndDelete(id);
Week 11-12: PostgreSQL & Prisma (SQL Path)
Why Learn SQL Too: While MongoDB is great for learning and many use cases, relational databases (PostgreSQL, MySQL) remain the enterprise standard. Learning both makes you a more versatile developer.
Core SQL Concepts for Backend Developers:
Database Design:
- Normalization – organizing data to reduce redundancy
- Relationships: one-to-many, many-to-many
- Foreign keys linking tables together
Essential SQL Queries:
SELECT * FROM users WHERE email = 'user@example.com';INSERT INTO products (name, price) VALUES ('Laptop', 999.99);UPDATE users SET status = 'active' WHERE id = 1;DELETE FROM sessions WHERE expires_at < NOW();
Using Prisma ORM with TypeScript:
Prisma provides type-safe database access and simplifies migrations.
javascript
import { PrismaClient } from "@prisma/client";

const prisma = new PrismaClient();

// CREATE a user
const user = await prisma.user.create({
  data: { email: "alex@example.com", name: "Alex" }
});

// READ all posts by a user
const posts = await prisma.post.findMany({
  where: { authorId: user.id },
  include: { comments: true }
});
Practice Project for Phase 3
Extend your Task Manager API:
- Connect your API to MongoDB using Mongoose
- Create a Task schema with fields: title, description, status (pending/in-progress/completed), createdAt
- Replace the in-memory array with database operations
- Test every endpoint with Postman to ensure data persists after server restart
Free Resources for Phase 3
- MERN Stack Tutorial (GitHub) — Complete MongoDB setup: connection, schema creation, CRUD API, testing with Postman
- Learn Node.js App (Database Module) — Mobile learning for MySQL and MongoDB integration, CRUD operations, sorting
- Scrimba Backend Path (SQL Module) — Interactive SQL fundamentals, database queries, joins, PostgreSQL setup
🔐 Phase 4: Authentication & Security (Weeks 13-14)
Goal: Add user accounts and secure your APIs. Authentication is required for almost every real-world application.
Core Authentication Concepts
JWT (JSON Web Tokens) – The Industry Standard:
JWTs are stateless tokens that contain user information. After login, the server gives the client a token, and the client sends it with every subsequent request.
How JWT Works:
- Client sends email + password
- Server verifies credentials
- Server generates signed JWT (contains user id, expiration)
- Client stores token (localStorage, cookie)
- Client sends token in Authorization header:
Bearer <token> - Server verifies token on each protected request
Password Hashing with Bcrypt:
Never store plain text passwords. Bcrypt hashes passwords with salt, making them extremely difficult to crack.
javascript
import bcrypt from "bcrypt";
import jwt from "jsonwebtoken";

// SIGNUP: Hash password before saving
const saltRounds = 10;
const hashedPassword = await bcrypt.hash(password, saltRounds);
await User.create({ email, password: hashedPassword });

// LOGIN: Compare provided password with stored hash
const isValid = await bcrypt.compare(password, user.password);
if (!isValid) throw new Error("Invalid credentials");

// Generate JWT
const token = jwt.sign(
  { userId: user.id, email: user.email },
  process.env.JWT_SECRET,
  { expiresIn: "7d" }
);
Protecting Routes with Middleware:
javascript
const authenticate = (req, res, next) => {
  const token = req.headers.authorization?.split(" ")[1];
  if (!token) {
    return res.status(401).json({ message: "No token provided" });
  }

  try {
    const decoded = jwt.verify(token, process.env.JWT_SECRET);
    req.user = decoded;
    next();
  } catch (error) {
    return res.status(401).json({ message: "Invalid token" });
  }
};

// Use middleware on protected routes
app.get("/api/profile", authenticate, (req, res) => {
  res.json({ user: req.user });
});
Essential Security Practices
- Environment Variables: Store secrets (JWT_SECRET, database passwords) in
.env files. Never commit .env to version control. Add .env to .gitignore - HTTP Security Headers: Use the
helmet middleware to set security headers automatically: app.use(helmet()); - Input Validation: Never trust user input. Validate all data before processing.
- Rate Limiting: Prevent brute force attacks by limiting repeated requests from the same IP.
Practice Project for Phase 4
Add authentication to your Task Manager:
- Create User model (email, hashedPassword)
- Signup endpoint: POST /api/auth/signup (hash password, create user)
- Login endpoint: POST /api/auth/login (verify password, return JWT)
- Make all task endpoints require authentication (extract user ID from JWT)
- Each user should only see and modify their own tasks
Free Resources for Phase 4
- Node.js Course Content (GitHub collections) — JWT basics, password hashing with bcrypt, complete auth workflow
- Scrimba Backend Path (Auth Module) — Session management, route protection, implementing JWT
Critical Advice: Do not build your own auth system for production (use libraries like Passport.js or Auth0). But building it yourself for learning is the best way to understand the concepts. Interviewers will ask you to explain how JWTs work.
🚀 Phase 5: Production-Ready Skills (Weeks 15-18)
Goal: Turn your "working code" into production-quality software that real teams can maintain and deploy.
Week 15: Environment Configuration & Secrets Management
Multiple Environments:
- Development – on your machine with debug logging
- Staging – pre-production for testing
- Production – live user environment
- Use separate
.env files: .env.development, .env.production
Structured Logging:
- Replace
console.log() with structured logging - Include timestamps, log levels (info, warn, error), and correlation IDs
- Popular logging libraries:
winston, pino
Week 16: Testing Your APIs
Types of Tests:
- Unit Tests: Test individual functions in isolation
- Integration Tests: Test API endpoints with a real database
- E2E Tests: Test complete user workflows
Testing Tools with Node.js:
- Jest – Most popular testing framework
- Supertest – Test Express endpoints in memory
- Vitest – Modern replacement for Jest (faster)
Example API Test:
javascript
import request from "supertest";
import app from "../server.js";

describe("GET /api/products", () => {
  it("should return 200 with array of products", async () => {
    const response = await request(app).get("/api/products");
    expect(response.status).toBe(200);
    expect(Array.isArray(response.body)).toBe(true);
  });
});
Week 17: Containerization with Docker
Why Docker Matters: Your code works on your machine. Docker ensures it works on any machine—your coworker's laptop, the staging server, production servers.
Core Docker Concepts:
- Image: A snapshot of your application and its dependencies
- Container: A running instance of an image
- Dockerfile: Instructions for building your image
Basic Dockerfile for Node.js:
dockerfile
FROM node:20-alpine
WORKDIR /app
COPY package*.json ./
RUN npm ci --only=production
COPY . .
EXPOSE 5000
CMD ["node", "server.js"]
Docker Compose for Multi-Service Apps:
Run your app, database, and cache together:
yaml
version: "3.8"
services:
  api:
    build: .
    ports:
      - "5000:5000"
    depends_on:
      - mongodb
  mongodb:
    image: mongo:7
    volumes:
      - mongo-data:/data/db
volumes:
  mongo-data:
Week 18: Deployment & CI/CD Basics
Deployment Targets for Beginners:
- Railway – Simplest for full-stack apps
- Render – Excellent free tier for APIs
- Vercel – Great for Next.js apps (but serverless functions, not continuous servers)
CI/CD with GitHub Actions:
Automatically test your code and deploy on every push to main.
Example .github/workflows/deploy.yml:
yaml
name: Deploy to Railway
on:
  push:
    branches: [main]
jobs:
  test-and-deploy:
    runs-on: ubuntu-latest
    steps:
      - uses: actions/checkout@v4
      - uses: actions/setup-node@v4
      - run: npm ci
      - run: npm test
      - run: npx railway up
Practice Project for Phase 5
Deploy your authenticated Task Manager API:
- Write unit tests for your database model and auth functions
- Write integration tests for your API endpoints
- Containerize the app with Docker (app + MongoDB)
- Deploy to a free platform (Render or Railway)
- Your API should have a live URL you can share
Free Resources for Phase 5
- Free 5-Hour Node.js Course (Simplilearn) — Unit testing, end-to-end testing, Gulp, Grunt, SocketIO
- Scrimba Backend Path (DevOps Module) — Deployment, CI/CD basics, environment configuration
- Railway / Render Documentation — Step-by-step deployment walkthroughs for Node.js apps
🤖 Phase 6: AI-Assisted Backend Development (Ongoing)
Goal: Use AI tools to accelerate your learning and productivity without becoming dependent on them.
In 2026, AI coding assistants are not replacing developers. They are making good developers more productive. For freshers, they serve as powerful learning accelerators when used correctly.
AI Tools for Node.js Development
- GitHub Copilot ($10/month or free for students): Code autocompletion as you type; can generate entire functions from comments; best for generating boilerplate (new routes, schema definitions)
- Cursor (AI-powered IDE): Integrated AI chat that understands your entire codebase; can suggest refactors and debug errors. The Cursor MCP (Model Context Protocol) server can be configured with tools like the Crombie Framework to install AI skills, agents, and hooks automatically
- Coding-Agent CLI (Terminal assistant): Interactive AI assistant in your terminal; requires Node.js 22+ and GitHub Copilot subscription; can read and write files, grep content, run bash commands
How to Use AI as a Fresher
DO Use AI For:
- Generating boilerplate code (Express route scaffolding, schema definitions)
- Explaining error messages you don't understand
- Writing unit test templates
- Refactoring messy code into cleaner patterns
- Generating documentation for your API
DO NOT Use AI For:
- Copy-pasting code you don't understand into production
- Bypassing the learning process on core concepts (authentication, database operations)
- Generating your entire portfolio project without writing any code yourself
- Security-critical logic without manual review
The "Golden Rule" for AI Learning: Write the code yourself first. Ask AI to explain concepts when stuck. Compare its solutions to yours. Never deploy AI-generated code you cannot explain line-by-line.
Free Resources for Phase 6
- Crombie AI Framework (npm) — Free CLI tool that installs AI skills and agents for Claude Code, GitHub Copilot, and Cursor automatically
- Coding-Agent CLI (npm) — Free terminal tool for interactive AI-powered coding assistance via GitHub Copilot
📊 Phase 7: Building Your Backend Portfolio
Your portfolio is the single most important asset for landing your first Node.js job. Employers want to see what you can build, not just which courses you completed.
The Complete Backend Portfolio Checklist
Project 1 – Task Manager API (The Foundation)
- REST API with full CRUD operations
- MongoDB + Mongoose for data persistence
- JWT authentication (signup, login, protected routes)
- Each user sees only their own data
- Environment variables for configuration
- Deploy live (Render or Railway)
- Deployment Link in README
Project 2 – E-Commerce API (The Real-World Proof)
- Products: list, search, filter by category/price, pagination
- Users: registration, profile management
- Cart: add items, update quantities, remove items
- Orders: checkout process, order history
- Payments: Stripe integration (test mode)
- File uploads: product images using Cloudinary
- Email notifications: nodemailer for order confirmations
- Deployed + Swagger/OpenAPI documentation
This project structure mirrors a real GitHub course from John Smilga (Node Tutorial and Projects Course), which covers file upload, email sending, Stripe payment, e-commerce API, and a complete auth workflow (verify email, reset password).
Project 3 – Real-Time Application (The Differentiator)
- WebSocket-based features using Socket.IO
- Chat application, live notifications, or collaborative document editing
- Redis for caching and real-time data
- Containerized with Docker
- Set this apart from the other 90% of portfolios
How to Document Your Backend Portfolio
Your README MUST Include:
markdown
# Project Name

## Problem Statement
[Explain what business problem this API solves]

## Tech Stack
- Node.js + Express
- MongoDB + Mongoose / PostgreSQL + Prisma
- JWT Authentication
- Docker (if containerized)
- Deployed on [Render/Railway]

## API Documentation
[Link to live Swagger docs or Postman collection]

## Setup Instructions
1. Clone repository
2. `npm install`
3. Create `.env` file with these variables...
4. `npm run dev`

## Testing
- `npm test` runs unit tests
- Test coverage: [percentage]

## Deployment
- API live at: [your-deployment-url.com]

## What I Learned
[3-5 sentences about challenges you overcame]
💼 Career Application & Next Steps
You now have the roadmap from zero to deployment. Here's how to turn this knowledge into your first job.
The Fresher Entry Point
Job Titles You Can Target (Node.js Focus):
- Junior Backend Engineer — Build and maintain APIs, write database queries, implement authentication — Found at SaaS companies, fintech, e-commerce
- Node.js Developer (Junior) — Focus exclusively on Node.js services using Express or NestJS — Found at startups, mid-sized tech companies
- Full-Stack Developer (Entry) — Combine React/Vue frontend with Node.js backend — Found at consulting firms, product companies
- API Developer (Junior) — Design and document REST APIs, integrate third-party services — Found at platform companies, B2B software
Real Job Posting Requirements (UK Market, May 2026):
- Node.js skills are cited in 937 permanent UK job openings (6-month period)
- Top job titles: Developer (51%), Senior (26%), Full-Stack Developer (24%), Software Engineer (20%)
- Median Node.js salary in London: £90,000; UK excluding London: £70,000
- Remote Node.js roles: 395 openings with median £70,000
Industries Actively Hiring Node.js Developers:
- Financial services and fintech (banking apps, payment processing)
- E-commerce (inventory APIs, order management, payment gateways)
- Healthcare (HIPAA-compliant patient data APIs)
- Media and streaming (real-time content delivery)
- SaaS (subscription management, analytics APIs)
The Common Career Progression Path
- 0-3 months (Learning): JavaScript fundamentals, first Express API — Completed Task Manager API, understand async patterns
- 3-6 months (Building): MongoDB integration, authentication, deployment — Deployed live full-stack API with authentication
- 6-12 months (Junior Developer): Real team experience, code reviews, production debugging — Contributed to production codebase, fixed real bugs
- 1-2 years (Mid-Level Developer): Database optimization, system design, mentoring — Led a feature from requirements to deployment
- 2-4 years (Senior Developer): Architecture decisions, team leadership, performance tuning — Designed system that scaled to 100k+ users
Sample Resume Entry (No Experience Version)
Junior Backend Engineer (Project-Based) | Portfolio
TECHNICAL SKILLS
- Languages: JavaScript/TypeScript, SQL
- Frameworks: Node.js, Express.js
- Databases: MongoDB (Mongoose), PostgreSQL (Prisma basics)
- Authentication: JWT, bcrypt password hashing
- Tools: Git, Postman, Docker basics, npm
- Deployment: Render / Railway
PROJECTS
Task Manager API (Deployed: live-url.com)
- Built REST API with Node.js and Express supporting full CRUD operations (POST, GET, PUT, DELETE)
- Implemented JWT authentication with bcrypt password hashing; each user sees only their own tasks
- Connected to MongoDB using Mongoose with validation and timestamps (createdAt, updatedAt)
- Wrote 15+ integration tests using Jest and Supertest, achieving 85% coverage
- Deployed to Railway with environment configuration for development vs. production
E-Commerce API (Portfolio Project)
- Developed product catalog endpoints with search, filter by category, pagination
- Integrated Stripe payment processing (test mode) and Cloudinary for image uploads
- Added order management with email notifications using Nodemailer
- Documented all 25+ endpoints using Swagger/OpenAPI
- Containerized application using Docker (app + MongoDB services)
CERTIFICATIONS (In Progress)
- Scrimba Backend Developer Path – Node.js & Express completion certificate
- Simplilearn Node.js Course – 5-hour course certificate
EDUCATION
- Self-directed backend development (6 months, 3 complete API projects deployed live)
- JavaScript/TypeScript mastery through interactive courses and project-based learning
- Bachelor's Degree (any field) – demonstrating analytical thinking and discipline
The Interview Question You Will Be Asked
Question: "You're building a user authentication system for a new Node.js API. Walk me through how you would implement it securely."
Your Answer: "I would never store plain text passwords. When a user signs up, I would hash their password using bcrypt with a salt factor of 10-12 before saving it to the database. The salt ensures that even if two users have the same password, their hashes look completely different.
For login, I would find the user by email, use bcrypt.compare() to check if the provided password matches the stored hash, and generate a JWT (JSON Web Token) signed with a strong secret stored in environment variables. The JWT would contain the user ID and maybe email, with an expiration time (e.g., 7 days).
The client stores the token (in an HTTP-only cookie for web apps, not localStorage, to prevent XSS attacks). For every request to a protected endpoint, I would use a middleware function that extracts the token from the Authorization header, verifies it with the same secret, and attaches the decoded user info to the request object. This allows downstream handlers to know which user is making the request.
I would also implement rate limiting on login attempts to prevent brute force attacks, and probably use Helmet.js to set security headers. For production, I would enforce HTTPS so tokens aren't transmitted in plain text."
Why This Works: You demonstrated knowledge of bcrypt vs. hashing, JWT structure and verification, security best practices (HTTP-only cookies, rate limiting, Helmet), and production concerns (HTTPS). Answering without notes shows genuine understanding.
Your Next Steps for This Week
Do not try to learn everything at once. Build momentum with small, achievable wins.
Step 1: Set Up Your Development Environment (Day 1)
- Install Node.js (LTS version) and VS Code
- Install Git and create a GitHub account
- Sign up for MongoDB Atlas (free tier)
- Install Postman for API testing
Step 2: Take the Scrimba Learn Node.js Course (Week 1)
- Complete the 3.5-hour interactive course by Tom Chant
- Code along with every lesson—pause and edit frequently
- Earn your free completion certificate
Step 3: Build Your First Express Server (Week 1-2)
- Follow the 5-hour Simplilearn Node.js course
- Create a simple "Hello World" API with GET and POST endpoints
- Test with Postman
Step 4: Complete the Phase 2 Task Manager API (Week 3-4)
- Build the in-memory Task Manager API
- Test every endpoint
- Save your code to GitHub
Step 5: Connect Your Database (Week 4-5)
- Set up MongoDB Atlas (it's free)
- Follow the GitHub MERN tutorial to connect
- Convert your Task Manager from in-memory to database-backed
- Verify data persists after server restart
Step 6: Add Authentication (Week 6)
- Add JWT authentication using the resources from Phase 4
- Test protected routes with Postman (sending Bearer tokens)
Step 7: Deploy Your Live API (Week 6-7)
- Deploy your Task Manager API to Render or Railway (both have free tiers)
- Share the live URL on LinkedIn
Step 8: Join the Node.js Community
- Follow #NodeJS on LinkedIn
- Join Reddit community r/node
- Contribute to open-source Node.js projects on GitHub (start with documentation)
The moment you deploy your first API and see it respond to requests from anywhere in the world, you will understand the power of backend development. You are not just writing code—you are building systems that connect people, data, and services. That is the future of software. Start your journey today.


 Group / 1: 1 Sessions